


I have been searching for the perfect goodie bag for Sara's first birthday but everything I found was just too big, too small, too expensive (that's the most common). I WILL NOT spend such a hefty amount just for the goodie bag (Yeah, I'm a cheapskate. Bite me)
So, what did I do? DIY, of course. I just need A3 size coloured paper, scissors, cellotape and some ribbons. Okay, now I know it will sound like "Why bother, just go and buy the normal paperbag etc..etc"

To prove how easy it is to make your own goodie bag, here's a step-by-step instruction.
Print the wording on an A3 coloured paper. Cut according to the shape and fold based on the lines. Straight lines means fold it outside, and dotted lines means fold in to the insides. I suck at explaining, refer picture below :)
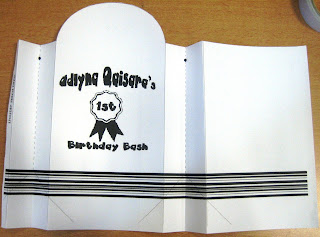
Notice the part where I wrote double sided tape? Fold the small section, put double sided tape and tape it together with the other end of the paper. Again, see the pic if you have no idea what I am talking about :)


I can never explain these steps eloquently, so I'll let the pictures do the talking. Hee...

Open the paper bag, adjust the folding, punch two holes, tie a ribbon and DONE!

Since sharing is caring, and I do care about all of you, here's the template I design, complete with all the lines and whatnot. Happy trying!
* This template is A4 size, you may need to adjust accordingly. Easiest way is to print it in A4 size, photostate and enlarge it to A3 size. You can edit the wording using paint. Simple, right?


1 comments:
yeayy!! thanx for sharing.. =)
Post a Comment